Posted by Bernice Lamb, Fri, Mar 20, 2020; updated Thurs, July 27, 2023
Whether it’s your first time or your 71st, hatching chicks never gets old. The excitement of seeing those first pips after 21 days of anxious anticipation is universal. Young or old, novice or seasoned veteran, no one can resist the cuteness of a cheeping baby chick!
Spring is just around the corner and hatching season is underway. A lot of you may be considering taking the plunge this year and purchasing your first incubator. Or maybe you’re expanding your breeding program and looking into new options.
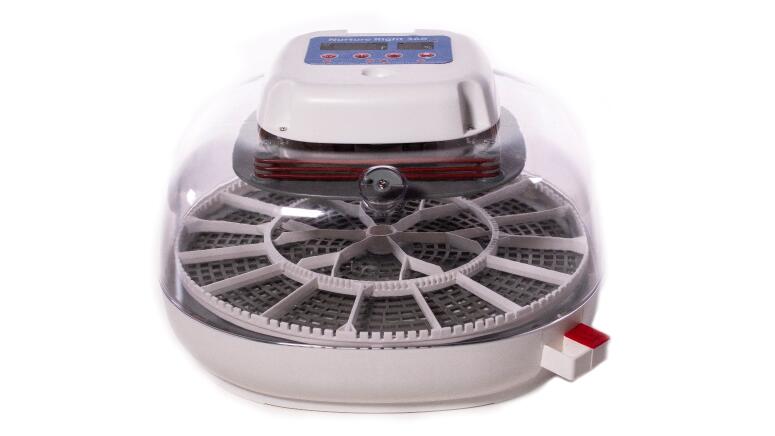
I recently had the pleasure of trying out the Nurture Right 360 Egg Incubator and, spoiler alert—it’s pretty amazing. The quality of life features this unit brings to the table are unmatched by any of the competition within a similar size and price point. It’s amazingly simple for beginners and reliable enough for pros.

The Best Incubator for Eggs
Hatching eggs for the first time can be a bit of an overwhelming experience once you start researching how it all works. Developing embryos are fragile and temperamental. Even just a degree or two difference in temperature can have disastrous results. Staying within the right range for humidity is equally important. Eggs must be turned multiple times a day as the chick grows. However, the Nurture Right 360 takes virtually all of the guesswork out of it.
The included instructions are easy to understand and very thorough. Out of the box it is set to the correct temperature of 99.5° Fahrenheit. It has clearly labeled water chambers: fill chamber A for the first 18 days, then fill both A and B for the last three days. It has a built-in countdown that tells you how many days are left until hatch day, and the turning rack stops automatically when the eggs go into “lockdown” on day 18.
It has a built-in candler so you can monitor the growth of the embryos and remove ones that are infertile or have stopped developing. Really the only responsibility you have is to make sure the water chambers are filled to the appropriate levels in order to maintain proper humidity during the first 18 days and the last three days. Wonderful!

How to Use Egg Incubator
So, it’s time to incubate some eggs! After setting up the Nurture Right 360 and letting it run for a few hours to stabilize the temperature and humidity, we’re ready to roll. Literally! Once I put my eggs in, I can test the turning rack to make sure all the eggs are rolling smoothly and not just sliding.
Once I determine that everything is rolling along properly, I’m all set! From here it’s just a matter of keeping water chamber A full and candling the eggs every week to monitor their progress until day 18. Day 18 comes, fill water chamber B and the turner stops on its own. Day 21 comes, babies hatch and we celebrate! It really couldn’t be any easier.
Do I recommend the Nurture Right 360 egg incubator?
Absolutely! I had a 100% hatch rate with zero complications. I’ve used my fair share of incubators, and what I’ve learned from my experiences is to always double check the temperature and humidity with my own thermometers and hygrometers. I’m happy to report that the digital readouts on the face of the Nurture Right 360 were extremely accurate. The 360° viewing window is a delight at hatch time. I wouldn’t call myself a fool—but it is proofed.
So here we are. You’re about to embark on your chicken hatching adventure! As your guide, I’d like to help you out and give you a few tips on making your foray into hatching a successful one.

Tips for Hatching Your Own Baby Chicks:
- Always set all your eggs at the same time.
- When gathering your eggs in preparation to set them into the incubator, choose ones that are fairly clean and free of cracks.
- Keep your eggs at room temperature, always wash your hands before and after handling them, and turn them at least once a day.
- It is not recommended that you wash eggs before incubation because doing so removes the natural bacteria barrier, or “bloom.”
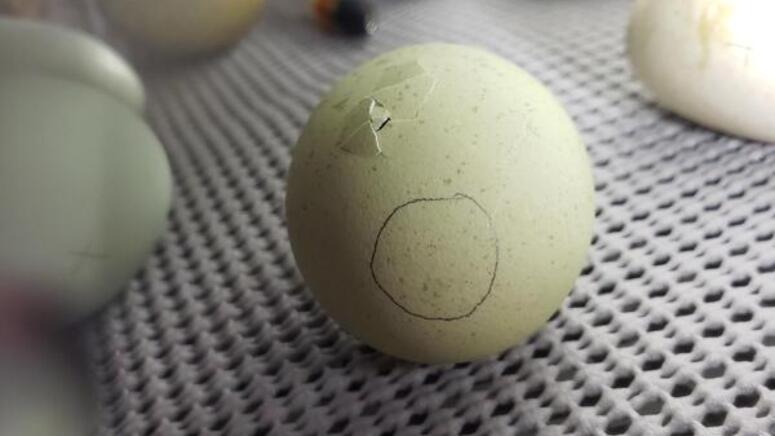
- It’s a good idea to use a pencil to mark one side of each egg with an “X” and the other side with an “O.” This gives you visual confirmation that the eggs are turning inside the incubator. While you are doing this, it is also a good idea to candle the eggs and trace the air cell at the “fat” end of the egg. The air cell will get noticeably bigger as the embryo grows, and this is a good way to monitor its progression.
- If you set eggs into your incubator before noon, consider that day to be Day 1. If you set eggs in the afternoon or evening, it is considered Day 0.
- Always remove eggs that have not started to develop by day 10.
- Also, if you are absolutely sure that an embryo has died, remove it. The last thing you want is a rotten egg festering in your incubator. It’s a ticking time bomb. The smell will haunt you for the rest of your life. It’s not likely to will explode, but why take the chance?
- When adding water into the incubator, use very warm water. It takes less time for the incubator to restabilize the temperature and humidity if it doesn’t have to work to heat up the newly added water.
- Incubating eggs is a process that is riddled with impatience. When day 21 comes, don’t rush the hatch. Do not open the incubator until all the chicks have hatched, or until day 23. Chicks can survive just fine without food or water for the first 3 days of life. They are still absorbing the yolk sack inside them which gives them all the nutrition they need.
- You might think that a chick needs help hatching or that they are taking too long. Hatching is hard work and baby chicks take breaks for many hours during the process of pipping and zipping. Opening the incubator can compromise the humidity and potentially “shrink wrap” a chick inside an egg, preventing it from being able to hatch.
- Baby chicks knocking around eggs that are still hatching is fine. Don’t interfere. Don’t rush the hatch.
- Incubating eggs that have been shipped to you through the mail is a topic for a whole different discussion. It is a big gamble and there are lots of factors to consider. Please do your research before even attempting to put shipped eggs into an incubator.

Featured Products

